May 20, 2026
A practical comparison of Anablock and Close CRM for inside sales teams, covering AI features, built-in calling, SMS, dialers, pricing, workflows, and which platform is the better fit for different sales motions.
In the modern business landscape, effective communication and efficient management of customer data are paramount. Salesforce Outlook integration empowers businesses by seamlessly combining the customer relationship management capabilities of Salesforce with the familiar interface of Microsoft Outlook. This integration not only saves time but also enhances productivity and collaboration among teams. In this comprehensive guide, we will walk you through the steps to integrate Salesforce with Outlook successfully.
Before proceeding, it's crucial to verify the current versions of Salesforce, Outlook, and your browser. Consult the official documentation from Salesforce and Microsoft to ensure that you are using the supported versions for integration. This step, often overlooked, is pivotal and can prevent numerous issues during the integration process.
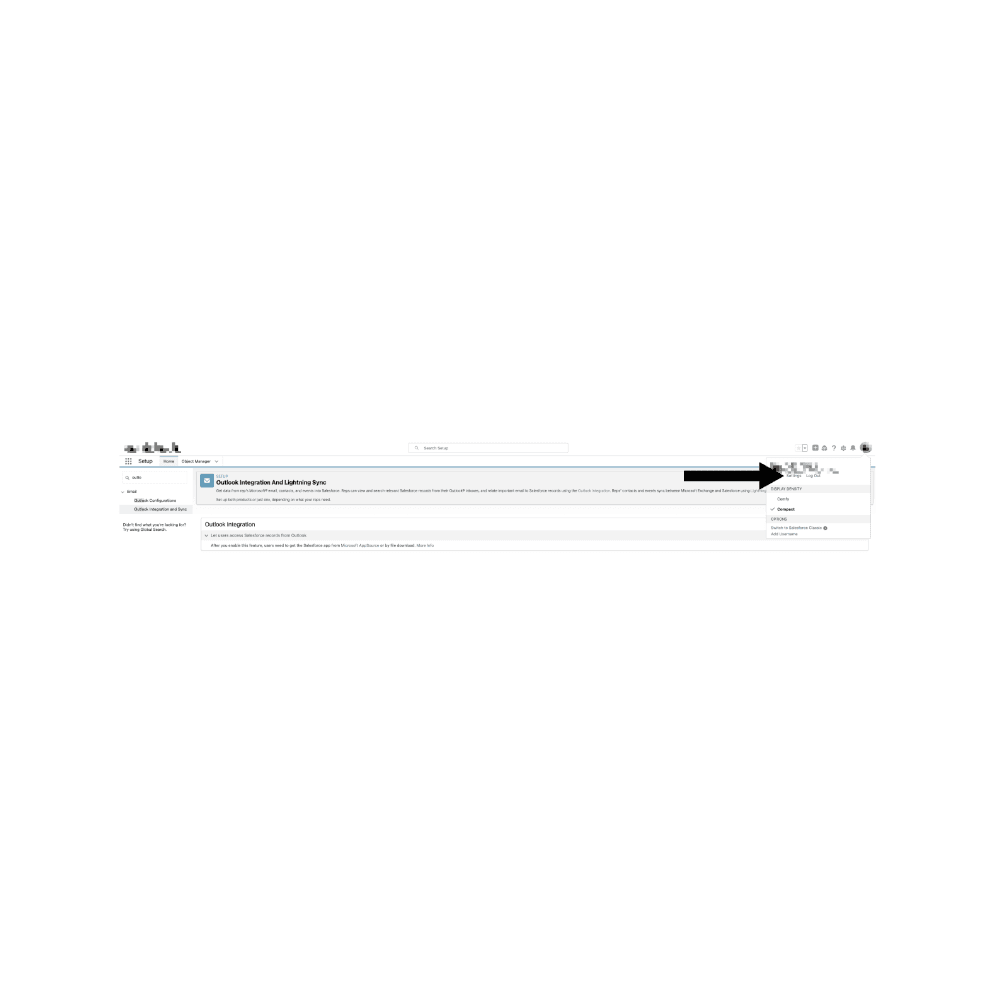
Now, let us dive into enabling an Outlook Integration in Salesforce itself. Log in to your Salesforce environment, go to SETUP, and in a QUICK FIND type: “Outlook Integration And Lightning Sync.”
After you select this option, click a button to enable Outlook integration, as shown on picture below.
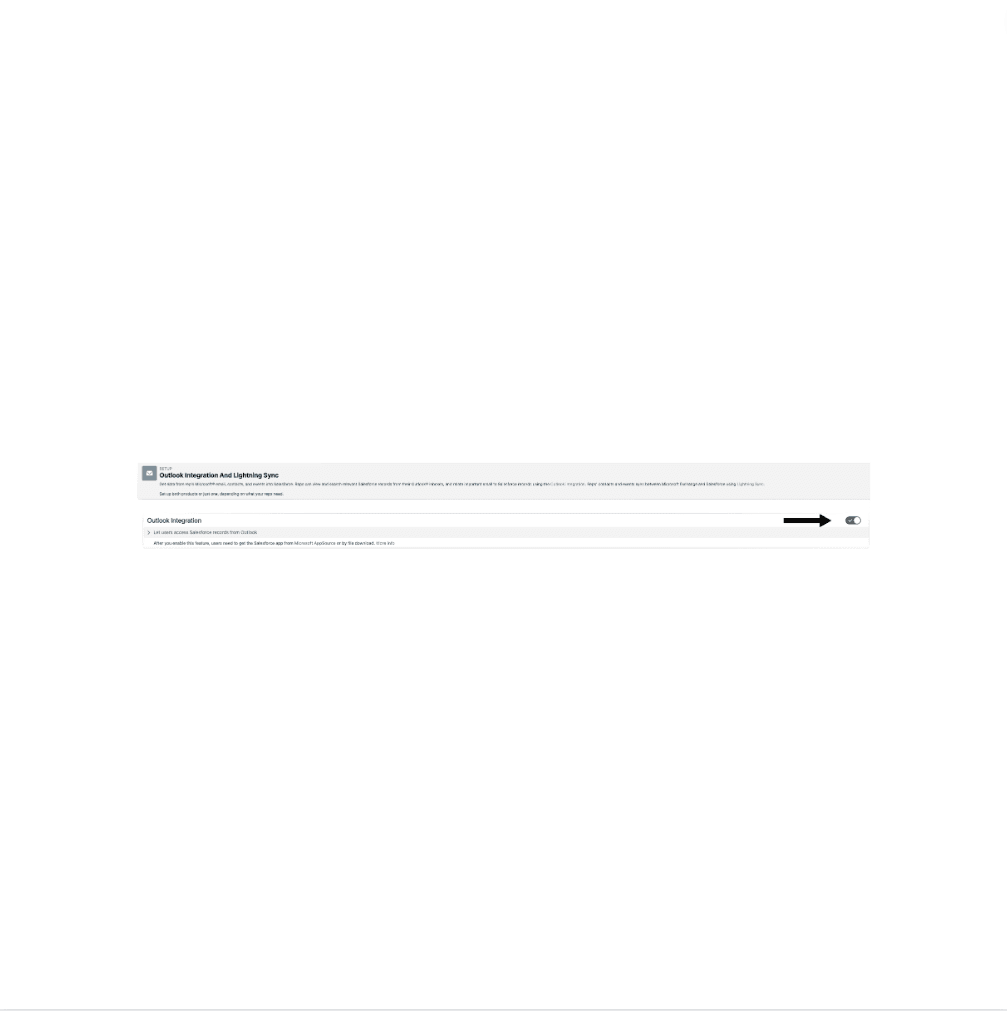
Upon enabling this feature within your Salesforce environment, users must acquire the Salesforce app either from Microsoft AppSource or by file download. This step is essential, as each Outlook user requires this Salesforce add-in for seamless integration.
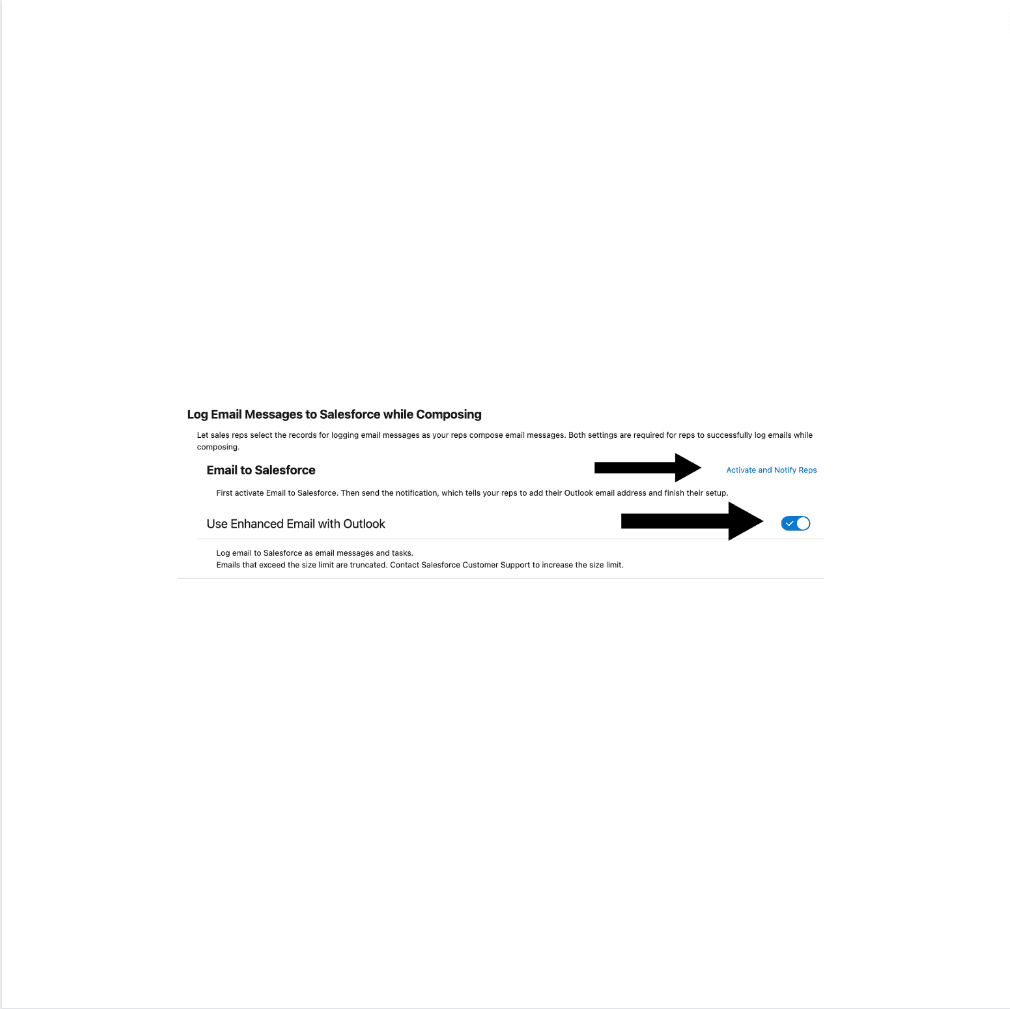
After you are done with above mentioned steps, navigate to the "Activate and Notify Reps" section and ensure the "Active" button is checked.
Additionally, enable the "Use Enhanced Email with Outlook" option. This allows Sales Reps to log emails directly from Outlook, streamlining the process for seamless communication tracking.
GOOD TO KNOW: If your company security policies don’t allow access to Microsoft AppSource, download the manifest file and distribute it to your Outlook users. If a new feature requires a change to the manifest file, the installed file doesn’t update automatically in Outlook. To give users access to those features, you must download a new file for users to install.
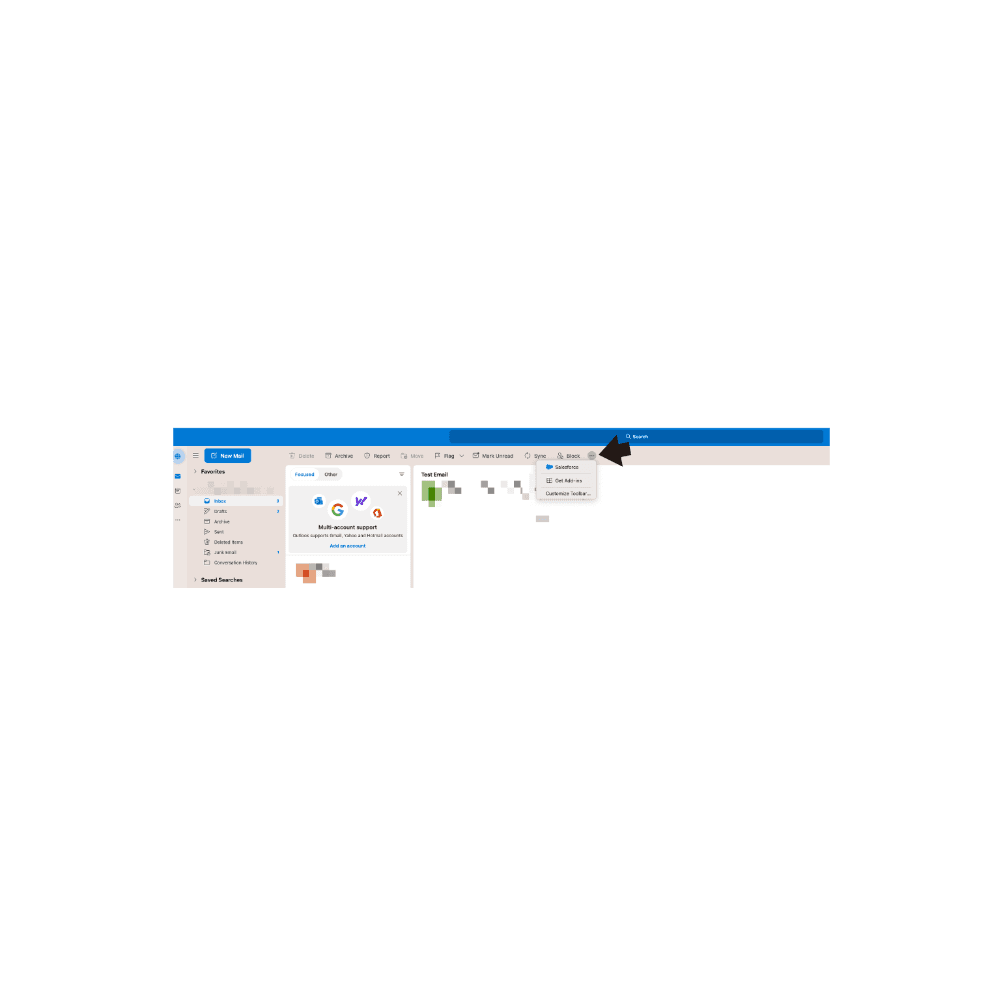
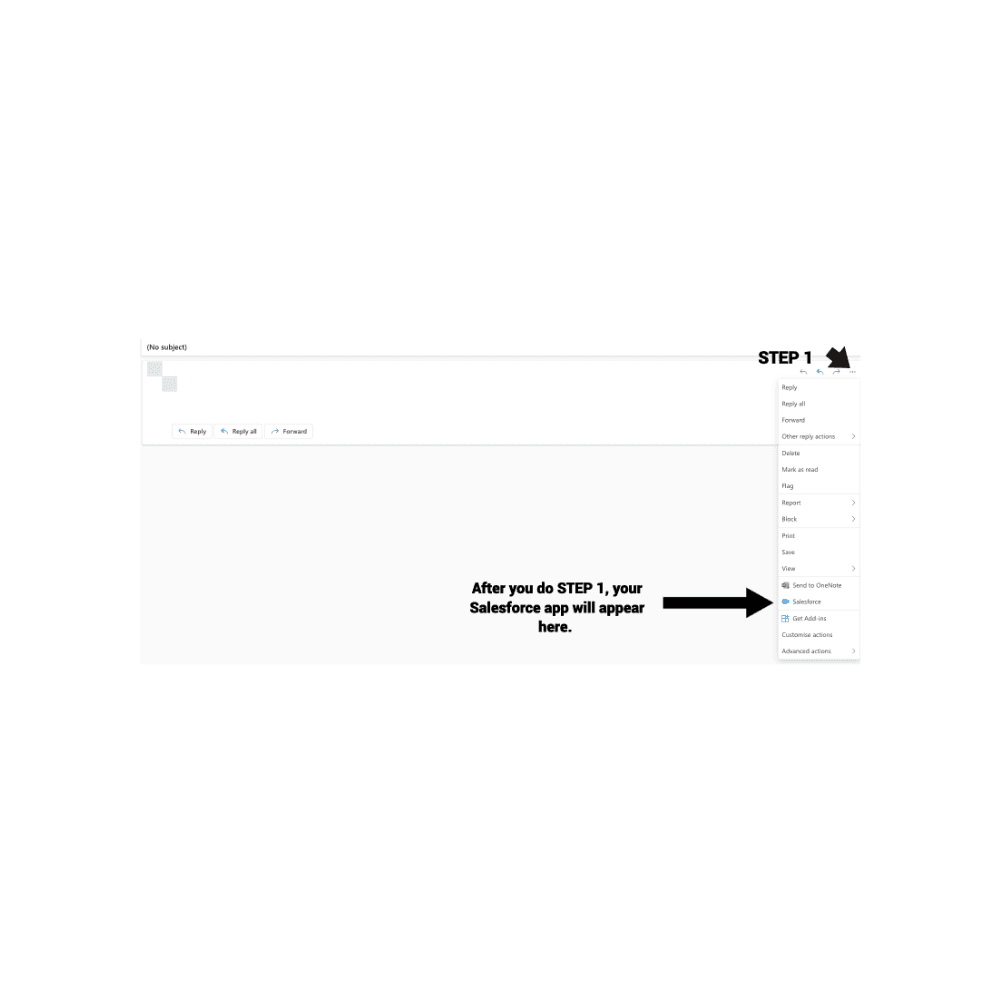
After you install the Salesforce App in Outlook, locating the it within Outlook can be a bit tricky. You can find it by selecting any email and clicking on the three dots to expand the options (these dots are located just beside the Forward button on the right side if you're using Outlook in a browser). An illustrative example is provided in the image below:
If you are using Outlook Desktop App, then your Salesforce Add-In is found here:
![]https://anablock-cms.com/uploads/4_1592b2a946.png)
GOOD TO KNOW: If you do not find the Add-In, just click on “Get Add-Ins” and search for Salesforce in there. Do not install Salesforce Composer Add-In, you just need the one called “Salesforce”.
Now, before we login inside Outlook to Salesforce, you need to check few things first. Go to your Salesforce environment, go to SETUP, and in a QUICK FIND type again “Outlook Integration And Lightning Sync.”
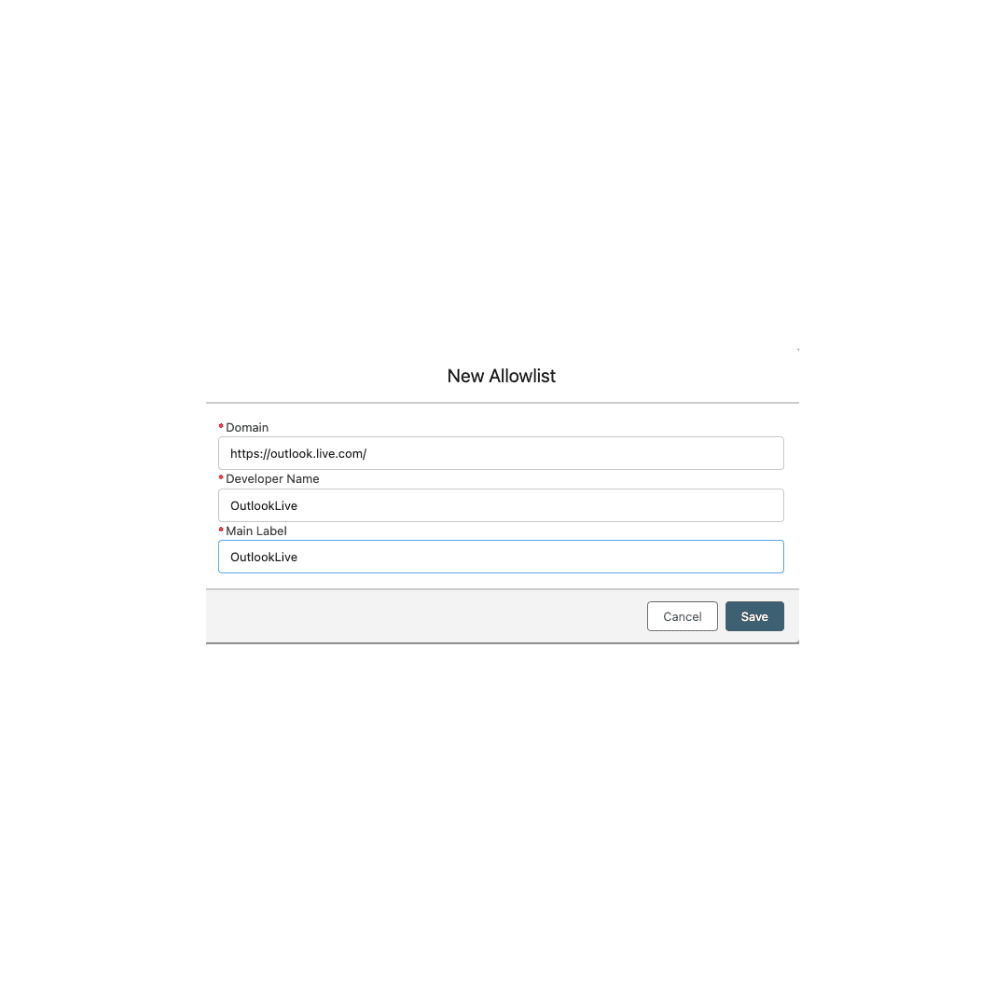
Open the integration, and scroll down to an option “Microsoft® Outlook® Web App Domain.”
It's crucial to ensure that the domain you intend to log in from is listed. If, for instance, the domain https://outlook.live.com/ is not present, you'll need to add it manually. Click on "NEW," input the domain URL https://outlook.live.com/ in the Domain field, provide the Developer Name and Mail Label, and then click "SAVE." This step ensures a seamless connection between your Outlook and Salesforce accounts.
Following the previous setup, it's essential to take another important step: ensuring your Outlook email is added to "My Email to Salesforce." To do this, navigate to your Salesforce environment, click on your User icon located at the upper right side of the screen, and select Settings. From there, proceed to "Email" and then click on "My Email to Salesforce." In the "My Acceptable Email Addresses" field, include your Outlook email address and click Save.
After you set this up, please go to your Outlook email on your browser or Outlook Desktop App.
Click on Salesforce Add-In, and login to your environment. Choose Production or Sandbox, depending in which environment you want to set up Outlook Integration.
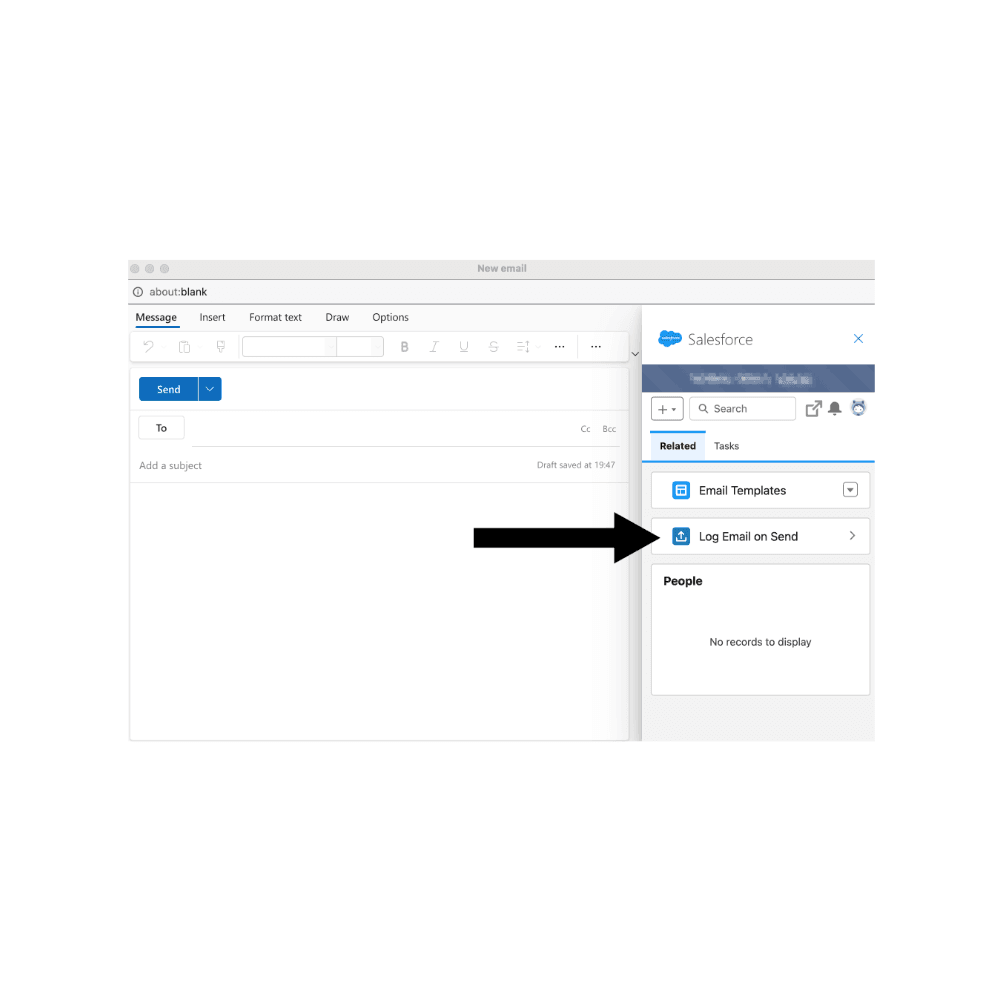
When prompted, confirm the connection, and you will be returned to your Outlook email. On left side panel, you will see that you are now connected to your Salesforce environment via Outlook. Now your Sales reps can log email and tasks, as they compose email messages. Congratulations!
When composing an email, use Log Email on Send, and select the Salesforce records to relate the email to after it sends.
When reading an email, use Log Email, and select the people records that you want to relate the email or event to in Salesforce. Standard users are listed first, followed by contacts, leads, and other people records such as community users. You can also log the email to one other record type, such as an opportunity.
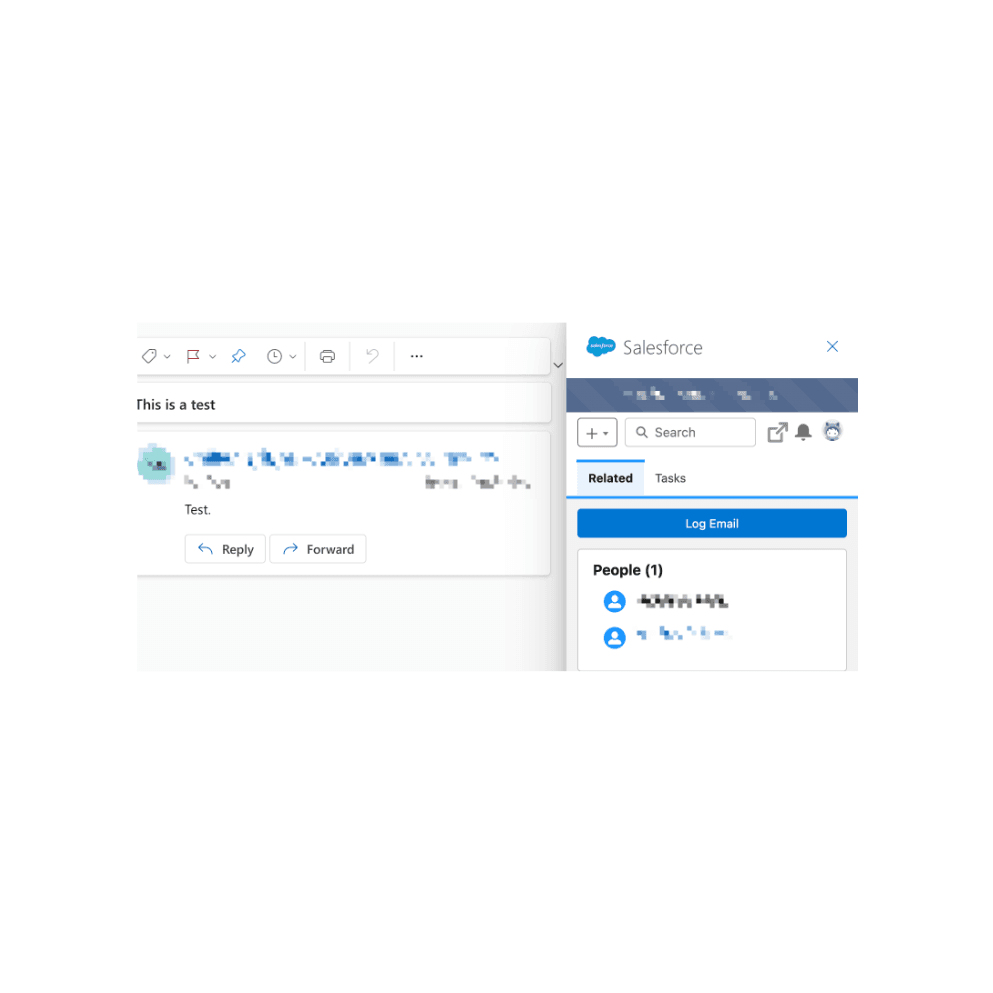
To log the email to other records that don’t show in the related records list, use Search.
You can select one other record to log the email to, such as an account or opportunity.
Email attachments are added as files in Salesforce. Your Salesforce setup determines where you can find the attachments. When emails are logged as tasks, attachments are available in the Files section of the Salesforce Email page layout. When emails are logged as email messages, find the files in the Attachments section of the Salesforce email. If you’re not sure how emails are logged, check with your Salesforce admin.
The Log Email on Send page in the integration doesn’t have an option to include attachments like the log email page for read email does. To log attachments automatically when using Log Email on Send, make sure that the Always save email attachments setting is selected in your My Email to Salesforce settings. If this option isn’t selected, attachments in emails sent using Log Email on Send aren’t automatically included with the logged email. To log email attachments manually from emails in your Sent folder, select the Include Attachments option.
*GOOD TO KNOW:
Sales reps and Users will have to manually log an email when they are sending it from Outlook, for it to appear in Salesforce. If you want automatic email logging and syncing, Einstein Activity Capture needs to be enabled, and this license is not free. There was a Lightning Sync option before, but is no longer available for setup. Salesforce included the Einstein Activity Capture instead of it, for Outlook Salesforce Integration.*

By following the steps outlined in this guide, you are well on your way to achieving a seamless integration experience. Should you encounter any challenges or have further questions, don't hesitate to consult the relevant documentation or seek assistance from experts. We hope you found this guide insightful and valuable in your integration journey. Here's to streamlining your processes and maximizing productivity. If you have any more queries in the future, feel free to reach out. Wishing you success in your Salesforce Outlook integration endeavors!